TENTS
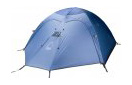
- When choosing a tent. be realistic. Shelling out for the latest lightweight wonder if you mostly car camp will only tighten your wallet and cramp your style. And while that burly expedition tent is enticing. its probably overkill if you can't remember the last time you weathered a gale-force storm.
- Tent-pole wrestling is like a national sport at campgrounds across the country. If you want to skip the next rainy day bout choose a tent that sets up quickly. Pole clips are generally faster than continuous sleeves; colour-coded poles and
grommets ease things even further.
- Vestibule space is key for dealing with inclement weather. At a minimum, you need enough space to stow all your gear out of the rain with a little space left over to come and go. For multi-night trips, 10 square feet per person is a good benchmark.
- When it comes to livable space, a tent's layout and wall angles - the steeper, the better - are as important as actual square footage. Your best bet - even if it does feel silly - is to get inside with your partner and some gear in the store.
- While you're inside, check for taped seams: they're essential for keeping water out. Not taped? You'll need to apply an aftermarket seam sealer.
- Details like a gear loft, interior pockets, reflective zippers (to help you find your tent at night), dual doors, and a separate footprint may seem like insignificant extras on the showroom floor. But outdoors they can immensely improve the livability - and lovabitity - of your tent.
- Colour matters. A yellow fly, for example, can be truly therapeutic under gloomy skies. White and blue, on the other hand, are soothing under a hot sun. Unless you want to bake, avoid dark colours.
- Rainflys and floors are rendered waterproof by their DWR (durable water repellency) coating. The quality of this coating determines how long it will last before it starts seeping. Consider a 1500mm rating as a minimum for the fly, and 2000mm for floor.
SLEEPING BAGS
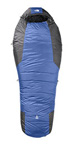
- Down insulation is rated by fill power. The higher the number, the more loft, which translates into more warmth per gram. Consider 600-fill or above as a minimum. Currently, 900 is the best.
- No matter how high the fill power, wet down offers zero insulation. Problem is, condensation is a fact of life when living in a tent. The key to a dry and warm bag is a water-resistant or waterproof shell. Most top-quality bags have them. The best also have welded, rather than sewn, seams to create an even better seal.
- Synthetic bags are cheaper and warmer when wet. If you choose one, seek out a model fitted with a quality brand-name insulation like Polarguard or Primaloft.
- There is nothing more frustrating than a side zip that constantly snags. Here's the deal: if the side zip snags - even once - in the store, move on. It will only be worse in the middle of the night in a cramped tent when you have to pee.
- Speaking of zippers. Unless you are absolutely obsessed with shedding grams, opt for a full-length side zip. The minimal extra weight is worth the added venting.
- In sleeping bags, size does matter. A snug mummy bag is the most efficient, but if you're claustrophobic, you won't get a good night's rest anyway. On the otherhand, a bag with too much extra room will sap valuable energy to heat empty space.
- You've shelled out for a good bag. Now spend a few extra bucks on a silk or cotton/poly bag liner. It will add warmth and comfort, and, more importantly, keep your new bed free of grime and oil.
- Though temperature rating guidelines have been established in Europe, on this side of the pond they are still an approximation at best. For now, start with the lowest temp you plan to sleep in and subtract about 5 °C (ie, if it rarely drops below zero at night, a -5 °C bag will be perfect). But remember, not all bags with the same rating are equal - ask the sales people for their opinions on different brands.
BACKPACKS
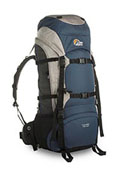
- Start by figuring out how much volume you'll need:
- 40 to 55 litres is ideal for light overnight trips or gear-intensive day tripping.
- 60 to 75 litres is sufficient for weekend to week-long summer outings.
- 75 Litres or more is strictly for winter trips or full-blown expeditions.
- Ultimately, let your gear decide. Yes, that means lugging your gear to the store, but it's the only way to accurately find out. Be sure to allow a little extra space for items like food that will be added later.
- Next, choose a style: top-loader or panel loader, pared down or fully featured. What works best for you will come down to personal preference. Do you like the simplicity of having all your gear in one main compartment or do you prefer to organize it in individual pockets? Is light weight or durability your priority?
- Now that you've narrowed your choices, focus on fit. This is the hard part:
- Start by measuring your back length from the seventh vertebra (the bony lump at the base of your neck) straight down to a spot on your lower back that lines up with the top of your hip bones.
- Check the in-store chart for the corresponding pack size and try it on loaded with gear.
- You've got the right fit when the hipbelt sits on the crest of your hip bones (not your waist), the shoulder straps round over your shoulders with plenty of contact and enough length at the bottom for minor adjustments, and the load lifters (the straps that extend to the pack above your shoulders) sit at around 45 degrees when tightened.
- Once you've found a couple of models that suit your needs and fit your body, walk around the store in each - again, loaded with gear. Any pinching or prodding or discomfort? Move on. A small annoyance in the store will likely turn into a major pain on the trail.
- Lastly, if necessary, dial the fit in by exchanging the hipbelt and shoulder harness with others in the store.
BOOTS
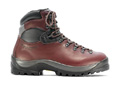
- When shopping for boots, remember one simple rule: fit before features. The latest style and features are meaningless if your boots are too uncomfortable to wear.
- Beyond that, follow three basic guidelines: find a shop with knowledgeable staff, wear the socks you will hike in, and shop after you've been on your feet for a few hours (so they are fully expanded).
- Narrow down your choices by where and when you plan to hike most often. Boots made with one-piece leather uppers and/or a Gore-Tex lining are ideal for wet and mucky climates. A high rubber rand adds protection for rocky terrain. Breathable fabric uppers, on the other hand, are ideal for hot dry weather.
- All leather is not equal. Full-grain or nubuck leather is the best and will last the longest. Split grain or suede (not to be confused with the reversed full-grain leather used on top-end mountain boots) is less durable, but also less expensive.
- Multi-day hiking boots should be rugged and stable for carrying heavy loads over rough terrain. But they don't have to be heavy. Since you have to swing your boot with each step, a few extra grams can quickly translate into a lot of fatigue.
- Durability is in the details. Good craftsmanship shows in the quality and consistency of the stitching, the eyelet attachments and the glueing. Don't be afraid to pull out the insole and take a close look.
- Most boots - even expensive ones - ship with flimsy insoles that provide little support. A good aftermarket insole - either heat mouldable or off-the-shell - will add comfort and performance, and reduce foot fatigue on the trail.
- The key to buying the right pair of boots is to be diligent and patient. This will be one of the more important gear choices you make. The more time you spend in the store nailing the perfect fit, the less time you'll spend agonizing on the trail.
TRAIL RUNNERS
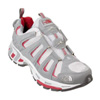 As with all shoes, fit should be your first concern when seeking out a light hiker or trail runner. Once you find a few models that feel good, narrow your choice down with the following considerations:
- How much cushioning you need depends on where your running adventures take you. If you clock a lot of kilometres on roads or hard-packed gravel, seek out a hybrid shoe that has the cushioning of a road runner. Pound the pavement with a true trail runner and you'll be nursing injuries in no time.
- Not all rubber is equal. For rocky terrain, sticky rubber - borrowed from the rock-climbing world - provides the surest footing. For muddy or loose ground, deep self-cleaning lugs and a harder rubber are best.
- On truly adventurous mountain terrain, sharp rocks are par for the course. A protective plate or lightweight plastic shank will protect the bottom of your foot from painful bruising.
- In the store, a mesh upper and leather upper may feel much the same. Get outside and you'll quickly notice the difference. Mesh breathes better, but is less durable. Leather can be hot, but will last longer and keep your feet drier in the muck.
- For true waterproof performance, choose a shoe with a Gore-Tex XCR liner. Just remember, they are clammy in hot weather, so don't bother spending the extra money unless you can remember the last time you got a soaker on the trail.
- A stiff heel counter - the cup that wraps around your heel - is the key to a supportive, non-slip fit and healthy ankles. Give the shoe the baby-cheeks test. Grab the shoe from behind between fingers and thumb and squeeze: if it gives way like soft baby cheeks, move on.
- For alpine scree or beach hiking, a sealed neoprene cuff and a gusseted tongue that's sewn to the body of the shoe will do wonders to fend off irritating pebbles and sand. Can't find a seated shoe that fits? Pick up a pair of lightweight ankle gaiters.
DAY PACKS
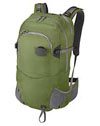
- A good day pack should be like a friend you want to travel with every day. The key is to find a pack that suits your needs.
- If you plan to use it for commuting in town, make sure it has ptenty of compartments - for a laptop, a music player and any other daily essentials.
- On the other hand, if you're after a performance pack for hiking or trail running, make sure it has a breathable back panel - suspended mesh is the coolest - and side-compression straps to secure the load from bouncing.
- A hydration sleeve comes standard on most day packs, but not all sleeves perform equally. Some models route the drinking tube through the shoulder strap - convenient on the trail and inconspicuous in the city. Others have a separate compartment for the bladder, which means a leak won't soak your gear.
- If you regularly jam heavy loads into your day pack - climbing gear, say - be sure to choose a model with a hipbelt and a rigid back panel or light-weight stays that transfer the load to the belt.
- As with larger packs, a good fit is key. Thankfully, the process is much less complicated with these smaller packs. If it feels right and there is room for on-the-go adjustments, it's likely a good fit. To be sure, you'll need to load it with gear in the store - an empty pack won't tell you much.
- All else being equal, let the small details decide. Seemingly insignificant features - an MP3 pocket that you can easily reach, a secure key clip, a shock-cord attachment for lashing on a jacket - can all make life easier out there.
ADVENTURE PANTS
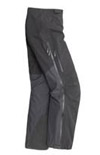
- Any pants will do for sightseeing, but for true adventure travel where you may be hiking, climbing, biking and riding ramshackle public transport, you need pants that are durable, quick-drying, low-key, and chafe-resistant. Small design features such as articulated knees, a gusseted crotch (seamless design) and flat seams can all add functionality to an otherwise normal pair of pants.
- While nylon is usually the fabric of choice for hiking pants, it may not be the best choice for travelling. Nylon dries quickly, stands up to abrasion well and remains wrinkle free. But it's less comfortable than cotton on long days, can harbour odorous bacteria, and often screams "tourist." A cotton/nylon or poly/cotton blend is often a better choice for its versatility.
- A built-in waistbelt lets you adjust the fit - for those extra burritos or layers of clothing - without adding the hassle of packing along a belt. If you plan to carry a pack, though, make sure the buckle is offset or flat enough to fit comfortably under the hipbelt.
- The mesh pockets found on hiking pants add ventilation and drainage in the event of a downpour, but they're about as durable as a wet tortilla when faced with keys, pocket knives or wallets. Look for durable nylon or cotton pockets - preferably zippered or hidden ones.
- White or cream pants may look good in the store, but you'll be cursing the name of John Travolta in no time if you pack them on a rugged trip. Instead, opt for dark earth tones that hide wear and tear.
WATCHES
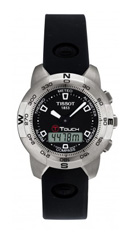 Modern outdoor watches are adorned with so many features these days its hard to keep up. Buff up your knowledge before you shop so you know what you're paying for:
- ALtimeter - Displays altitude above sea level based on barometric pressure. Resetting at known attitudes is key to maintaining accuracy. Good navigational tool for climbers and backpackers.
- Barometer - Measures air pressure. The best watches also keep track of barometric trends, which is immensely helpful in predicting weather changes.
- Compass - Electronic indication of direction of travel. True accuracy requires a built-in level bubble or three-dimensional technology.
- Interval timer - Lets user set two or more consecutive countdown times, with an audible beep in between indicating when to rest and when to go. Vital for interval training.
- Heart rate monitor - Measures your heart rate as you exercise. The best models will have an alarm that alerts you when you stray too far from your target heart rate.
- Hydration alarm - A regular reminder to drink fluids. Can be more than just a gimmick for long runs, hikes or bike rides.
Once you've decided what features you need, consider how they're presented. If you need a Ph.D. to access them, or the buttons are too small to operate with light gloves on, they may as well not be there.
Download the PDF file to read the whole article, size 3.19MB. (originally from Explore magazine)
 BestGear2006.pdf BestGear2006.pdf
|
|